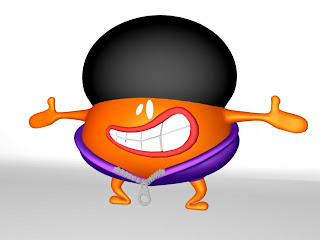
Today was quite an unproductive day as far as project work goes, not because I was lazy, but because I was too busy attending a life drawing session and a maquette making class! Anyway I managed to spend a couple of hours on our character.
- I started by making his hands bigger, as I felt in my original model they were too small, and would become fiddly to rig and animate. Plus he will be making alot of hand gestures, clenching his fists, or pulling funny muscular poses so we want the hands to be fairly prominant.
- Adjusted the eyes by reducing the poly count (beofre they were on a way too high smooth), and re texturing to a bright white.
- Added teeth - wahey, and what a difference, from the boring ring loop lips, adds much more personality and style. They are a seperate object to the lips, however I grouped them in order to create blendshapes.
- Modelled some simple feet to yesterdays stumps . However I was talking with Dan Dali today and he said the one thing to steer clear of when animating is - characters with small legs!! So its up to Dave whether he wishes to persist with rigging these small legs and feet which may cause a bit of fiddly hassle, or settle for the stumps I gave him yesterday, and he could sort of bounce along from stump to stump?! Dave the choice is yours, the feet I have modelled are clean, and have nice edge flow, but if you have difficulty I have the saved version with the stump legs.
- Played around with textures. I am happy with the ramp shaders applied to the afro, lips, skin, and suit as they fit our cartoon style nicely. I added a glistening shiny white phong shader for the teeth which works. I tried a few ideas for the zip but could really get what I wanted - so the metal zip can be retextured later on after rigging.
- Blendshapes - my conclusion today is that blendshapes are alot easier than what I thought. Its a simple case of duplicating what ever you want to change i.e my mouth and teeth. Altering the new copied version into a slightly different expression i.e sad, happy. I used a bend deformer to achieve a few test expressions, sad, happy, normal. Then going - shift selecting both (source, target) - create deformers - blendshape. Name it etc. Go window - blendshapes, and use the simple slider to watch your old shape blend into the new one. I key framed a few tests and the results were better than expected. I will come back to this later on when we are at the animating stage - add a few more expressions,and touch up the mouth. However I am really happy with the progress so far, and have saved myself time for later on in the project.
Dave you can pretty much begin rigging now - if you have finished the mansion that is! Patience boy lol. Below is the latest render of our guy at a higher res, and a playblast of the simple blendshape tests I carried out....


No comments:
Post a Comment